Authors
Lauren C. Mays, DNP, CRNP, FNP-BC1, Melanie Baucom, DNP, CRNP, FNP-BC1, Emily
Patton, DNP, CRNP, FNP-C1, Katie Buys, DNP, MPH, FNP-BC, PMHNP-BC1, Deborah Bowers,
DNP, DMin, MDiv, CRNP, FNP-C1, Rebecca Jacobs, MSN, RN, CNS1, Holli Mock, BSN1,
Mantana Damrongsak, PhD, MSN, MPH1, Alice Bristow, DNP, CRNP, FNP-BC, CNE, BC-ADM1
1University of Alabama at Birmingham School of Nursing, Birmingham, AL
Conflict of Interest Statement
The authors have no conflict of interest or disclosures.
Corresponding Author
Lauren C. Mays, DNP, CRNP, FNP-BC, University of Alabama at Birmingham School of
Nursing, Birmingham, AL
(Email: laurenc@uab.edu)
Brief Description
Primary care providers must master a diverse skill set to properly care for their patients in the primary care setting. As nurse practitioner (NP) education evolves, national standards set by the American Association of Colleges of Nursing (AACN) and National Organization of Nurse Practitioner Faculties (NONPF) prompt skill competency through quality NP education. Primary care skills are an essential component of NP education; however, many challenges are associated with successfully teaching and learning these skills. In this article, cost-effective simulation examples are described for five common primary care skills.
Background
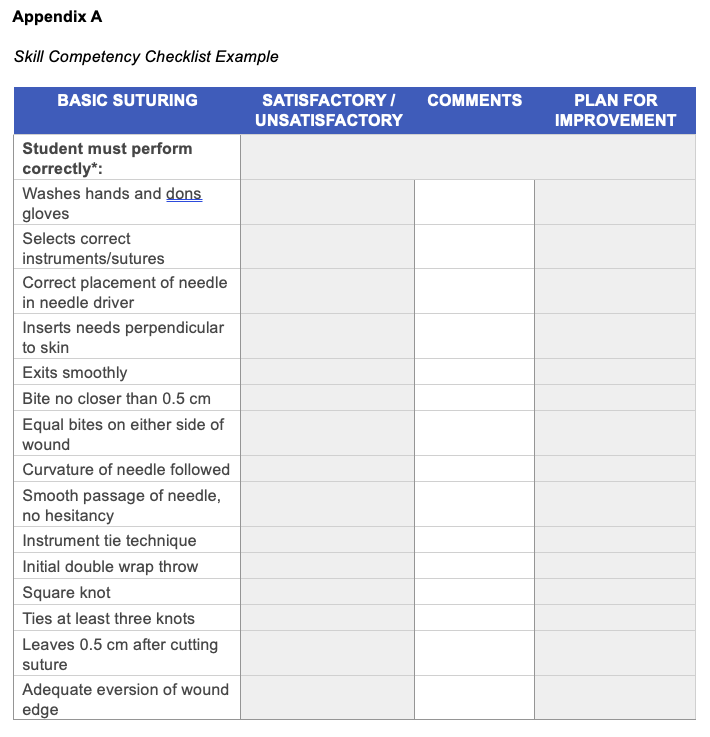
NP education is evolving towards competency-based education that is demonstrable, observable, and measurable. Consequently, students learn to cohesively apply disciplinary knowledge of content through psychomotor and cognitive domains to adeptly care for individuals. The National Task Force for Quality NP Education (NTF), supported by AACN’s The Essentials: Core Competencies for Professional Nursing Education and NONPF’s NP Role Core Competencies, requires NP programs to prepare students for nationally recognized patient care competencies, including direct patient-care skills (NTF, 2022; AACN, 2021; NONPF, 2022). However, family nurse practitioner (FNP) students face several potential limitations to learning and mastering these skills: limited accessibility and the unpredictable nature of patient encounters, lack of structured environment for deliberate practice, and time constraints in busy clinical settings. All these factors restrict the availability, extent, and quality of deliberate practice and potential learning scenarios. Ethical considerations related to performing a procedure on a patient for the first time further impact the breadth and depth of skill acquisition. These challenges highlight the importance of using simulation to overcome the limitations traditional clinical learning environments, while ensuring students accountability using a standardized competency checklist (Appendix A).
Simulation offers a safe, structured environment that mimics real-world scenarios without exposing patients to potential risks (Alinier & Oriot, 2022). In the simulated setting, FNP students can refine primary care skills without the pressures of live clinical encounters. This environment encourages a trial-and-error approach, fostering a culture of experimentation and continuous improvement. The controlled environment also facilitates deliberate practice, enabling students to reinforce essential skills to achieve mastery.
Moreover, simulation scenarios can target areas where students may lack exposure in clinical settings (Chernikova et al., 2020), such as primary care procedural skills. Overall, the safety afforded by simulation empowers NP students to build confidence and competence, preparing them to be practiceready in the complexities of healthcare settings (Bailey & Emory, 2022; Zulkosky et al., 2021).
The purpose of this article is to present cost-effective simulations for five procedural skills commonly performed by FNPs in primary care settings. It also illustrates how FNP students, novice practicing NPs, nursing faculty, or preceptors can adapt these simulations to cultivate Collectively, the authors of this manuscript have more than 60 years’ experience as advance practice providers and more than 45 years in simulation, holding various best-practice simulation certificates. Collaboratively, they served as subject matter experts to develop authentic representation of common skills in primary care.
Methods
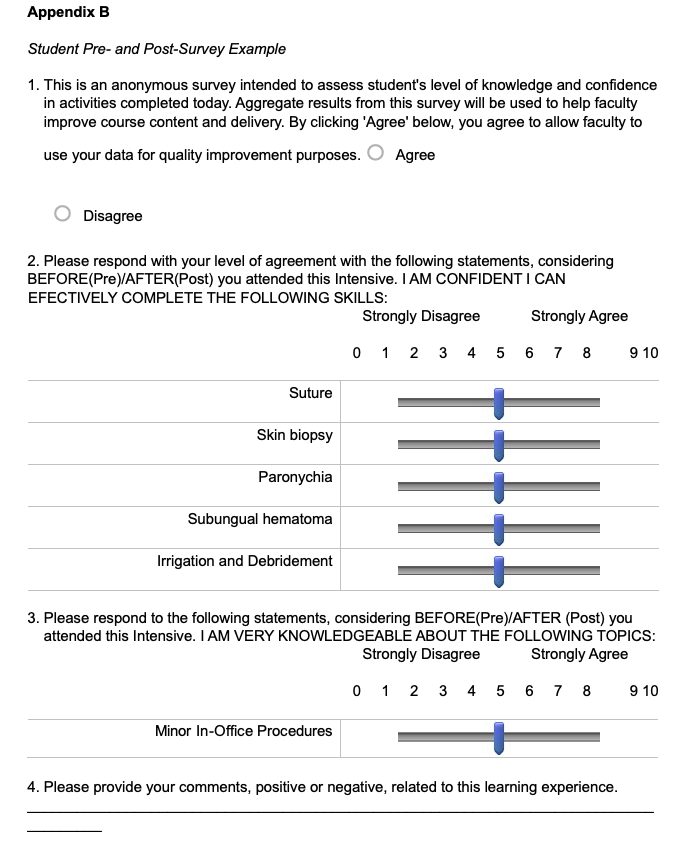
Preclinical FNP students (n=123) participated in the skills simulation. Students completed five simulations as follows: suturing, incision and drainage, shave biopsy, paronychia drainage, and subungual hematoma trephination. Students were given a survey before and after the simulation to rate their confidence level for an individual skill. The rating scale ranged from 0, indicating no confidence in skill readiness, to 10, indicating feeling completely prepared to conduct these skills in the clinical setting (Appendix B). Qualitative feedback on the delivery of skills training and students’ concerns were also collected. Pre-and post-simulation survey results were averaged and analyzed using paired t tests.
Suturing
Suturing is a common skill that involves using stitches to approximate and secure wound edges, facilitating the natural healing process. This skill is performed by healthcare providers to close lacerations, incisions, or other wound types to promote healing, minimize scarring, and reduce the risk of infection.
Procedure Indications. Indications for suturing include a wound or laceration that will not heal easily without assisted closure. Examples include wounds in high-use areas like the hand; those where minimal scarring is important like the face; those requiring closure to aid in hemostasis; and those that are large enough that natural closure would be prohibitive.
Example Simulated Case Presentation for Suturing. A patient presents to clinic with a laceration to their left thumb. The patient was cutting vegetables when the knife slipped and cut the flexor side of the thumb measuring 2 cm in length. Bleeding is controlled at present.
Procedure Supplies. The estimated cost per student is $48.34. The supplies used include the following:
- Premade suture pads
- Suture training kit:
- 3-0 curved cutting needle suture
- Needle holder
- Hemostat
- Scissor
- Pick-up with teeth
- Scalpel
- Simulated Lidocaine (labeled NOT FOR HUMAN USE. EDUCATION ONLY.)
- Alcohol pads
- 4x4 gauze
- 3 cc syringe
- 18-, 22-, or 25-gauge needles
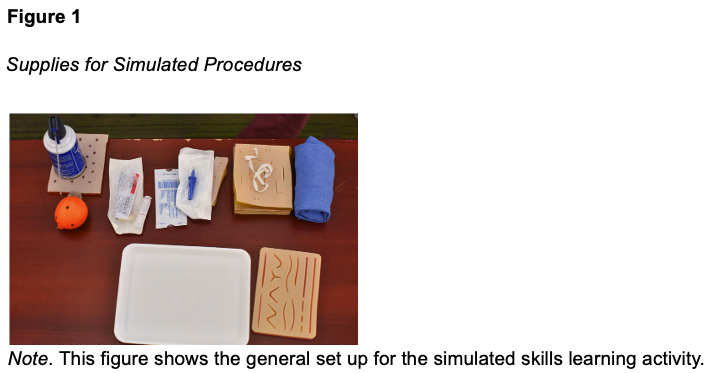
Step-by-step Simulation Description. Simulated skin tissue with premade suture pads is used for students to practice suturing skills. The compiled ‘suture training kit’ described above is rolled into a blue surgical towel and provided to students with the premade suture pad (Figure 1).
Suturing Procedure Process. Students receive a brief introduction in preparation for the experience. Students are educated on how to choose an appropriate suture type and technique based on the wound type. The students are provided an opportunity to familiarize themselves with equipment such as the laceration tray supplies, the packaged sutures, and the simulated sterile environment. For the simulated thumb laceration, the students are provided with simulated lidocaine and instructed on administration of local anesthesia to the wound. The students are provided detailed instructions on how to perform the various suture techniques including: simple interrupted, continuous (locking and non-locking), subcuticular, and mattress stitch. Faculty and staff are available to assist and answer questions while students practice on the simulated skin.
Incision and Drainage
Incision and drainage (I&D) is widely used for the management of skin and soft-tissue abscesses, particularly in emergency departments and outpatient settings. Most abscesses are caused by Staphylococcus aureus, and I&D is recommended unless the abscess is small and draining spontaneously (Becker, 2023).
Example Simulated Case Presentation for Incision and Drainage. A patient presents with a two-day history of a swollen, tender, erythematous lesion located on the upper thigh. Upon inspection, the nurse practitioner notes the lesion is fluctuant and recommends I&D.
Procedure Indications. In most cases, patients with an abscess will require I&D. A trial of antibiotics with manual expression of pus can be considered in cases of small fluid collections. However, antibiotics are generally inadequate once a collection of pus has formed (Derksen, 2020; Pastorino & Tavarez, 2023). Possible contraindications include abscesses that are large and deep, or near vascular and/or nervous structures. Abscesses in certain locations, such as perirectal or periareolar, should be referred for surgical management due to high risk for potential complications (Pastorino & Tavarez, 2023).
Procedure Supplies. The estimated cost per student is $25.84. The supplies used include the following:
- “Pus Pocket” Ingredient List
- 1 cup of quick oats
- 2 cups of warm water
- 2 drops of yellow food coloring
- Latex gloves (cut off glove fingers at the palm) or finger cots
- Procedure Supplies
- #11 scalpel
- Iodoform packing strips
- Q-tips
- 4x4 gauze
- Antiseptic solution
- Simulated Lidocaine (labeled NOT FOR HUMAN USE - EDUCATION ONLY)
- 3 cc syringe
- 18-, 22-, or 25-gauge needles
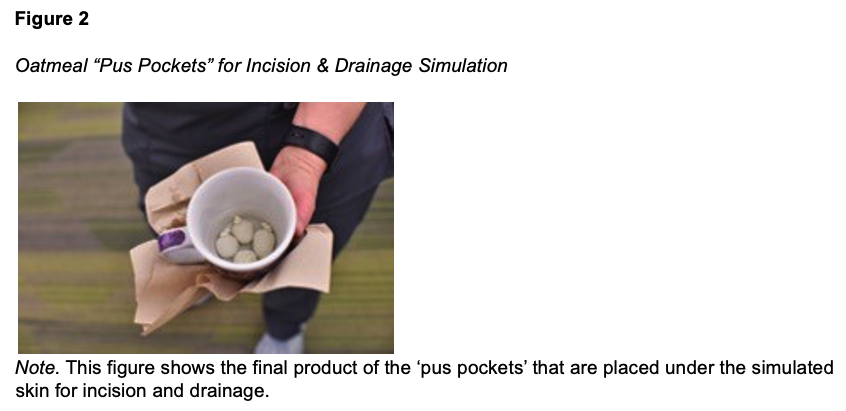
Step-by-step Simulation Description. The process for making the simulated pus pockets using the above ingredients is quite simple. Mix oatmeal and water; you may need more water to create a soupy texture. Microwave the mixture for 1 minute. Allow to cool for 2 minutes. Add food coloring for desired color. Insert 3-5ccs of oatmeal mixture into finger cot and tie off tightly. Finger cots may be frozen for storage. When ready to use, room temperature oatmeal “pus pockets” are placed under premade suture skin to simulate an abscess. A small square can be cut from the back of the pad for better fit of the oatmeal pocket (Figure 2).
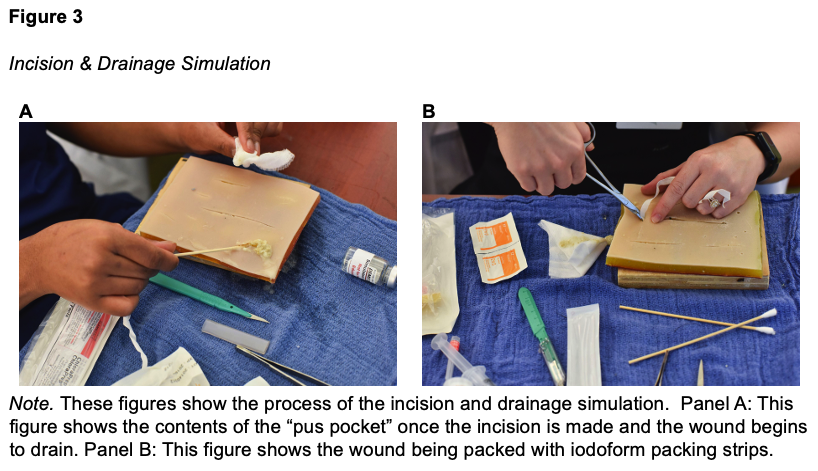
Incision and Drainage Procedure Process. Using the oatmeal “pus pocket” and premade suture skin as described above, students are instructed to begin by preparing the area with antiseptic solution and drawing up simulated lidocaine. Faculty guide students through the process of anesthetizing the area, focusing on tissue around the base of the simulated abscess. Using a #11 scalpel, students are instructed to make a simple linear incision directly over the center of the simulated abscess and manually express drainage from the oatmeal “pus pocket.” Students are taught to use hemostats to break up loculations and collect a sample for culture and sensitivity using a Q-tip. Then, faculty demonstrate how to irrigate the simulated abscess cavity using isotonic saline solution. Finally, students practice packing the wound using iodoform packing strips (Figure 3).
Shave Biopsy
A shave biopsy is a medical procedure in which a thin, superficial layer of tissue is removed from the skin using a scalpel or similar instrument. This type of biopsy is commonly performed to diagnose or investigate skin conditions, such as suspicious moles or skin lesions.
Example Simulated Case Presentation for Shave Biopsy. A patient presents with a single, brown scaly skin lesion on their back that has recently increased in size. Borders are well demarcated. Given the recent increase in growth, there is some concern for malignancy. Because the lesion appears confined to the epidermis, a shave biopsy is recommended to obtain a sample for pathological examination.
Procedure Indications. Shave biopsy can be a quick and effective means of removing external lesions of the epidermis in primary care (Alguire & Mathes, 1998). Shave biopsy can be used for two purposes: to remove cosmetic or uncomfortable lesions or to assist in accurately diagnosing a potentially cancerous lesion. For instance, this is particularly useful when the differential includes actinic keratosis and squamous cell carcinoma. Lesions that can be safely removed by shave biopsy include actinic keratoses, seborrheic keratoses, warts, skin tags, and superficial basal cell or squamous cell carcinomas. Lesions connected to pigmented epidermis should not be removed by shave biopsy, as doing so may artificially decrease the estimated thickness of a melanoma lesion. This could lead to inaccurate staging and prognosis.
Procedure Supplies. The estimated cost per student is $2.38. The supplies used include the following:
- Clementine orange
- Permanent marker
- #15 Derma Blade/razor blade
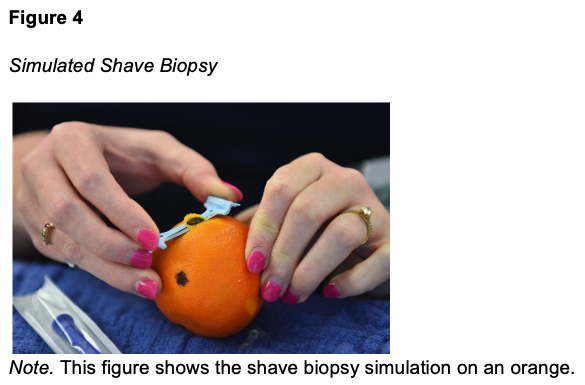
Step-by-step Simulation Description. Place an ink dot with a permanent marker on the orange to simulate the abnormal skin lesion. More than one lesion (ink dot) can be applied to the orange. Shave biopsy may be completed with a #15 Derma Blade, or a razor blade held between the provider's thumb and middle finger (Alguire & Mathes, 1998). For the purposes of this simulation, a #15 Derma Blade is used (Figure 4).
Shave Biopsy Procedure Process. Shave biopsies are clean procedures; sterile gloves are not required (Alguire & Mathes, 1998). Students prepare for biopsy by injecting anesthetic directly below the lesion marked on the orange, allowing the lesion to be easily differentiated from the epidermis. The students are instructed to hold the #15 Derma Blade parallel to the orange, simulating the patient’s skin. The lesion is swiftly removed in a single motion. During this, students practice stabilizing the lesion with the index finger of the opposite hand to prevent tearing or excessive bleeding with lesion excision. Students are then instructed to hold firm pressure at the site to reduce the risk of bleeding. Suturing is not needed with this type of biopsy. The site is then covered in a thin application of antibacterial ointment or petrolatum, to prevent becoming overly dry. This is followed by a non-adherent dressing and a gauze dressing with tape. Finally, faculty discuss the process of sending the lesion for biopsy.
Paronychia Drainage
Paronychia is an infection of the tissue surrounding fingernails or toenails. It can be chronic, usually due to a fungal infection lasting longer than six weeks, or acute, typically staphylococcal or mixed pathogens (Dulski & Edwards, 2023). Acute paronychia is common and may account for more than one-third of nail/finger infections (Billingsley & Vidimos, 2022).
Example Simulated Case Presentation for Paronychia. A patient presents to the clinic with pain, redness, and swelling around the nail of the right index finger. The patient mentions they frequently perform tasks involving moisture, such as dishwashing, and recalls a minor injury to the nail fold. On examination, there is noticeable tenderness, erythema, and swelling around the proximal and lateral nail folds of the right index finger. Based on the clinical presentation, a diagnosis of acute paronychia is suspected.
Procedure Indications. An abscess under the nail or skinfold is an indication for incision and drainage to prevent further tissue involvement. Because this is often done in primary or urgent care, FNP students are introduced to the procedure with a simulated abscess on a finger model. It is worth noting that many cases of paronychia in a toenail, such as an ingrown toenail, are treated with an avulsion procedure to remove the toenail and are not included in this content (Macneal & Milroy, 2023).
Procedure Supplies. The estimated cost per student is $12.79. The supplies used include the following:
- Supplies to create a sterile field:
- Sterile gloves o Drape
- Other PPE (as needed)
- Antiseptic solution
- Simulated lidocaine (labeled NOT FOR HUMAN USE - EDUCATION ONLY)
- 25- to 27-gauge needle for anesthetic block
- #11 scalpel blade or 18- to 23-gauge needle
- Irrigation solution
- Dressing material
- For the simulated model finger
- Plastic finger molds
- Unflavored gelatin packet and water
- Glycerin o Lotion
- Liquid foundation makeup
- Bubble wrap
Paronychia Drainage Procedure Process. After anesthetizing the area, students are instructed to use an instrument such as a scalpel or hypodermic needle to lift and open the affected skinfold. Any pus may be expressed from the abscess through manual decompression. The affected area is then irrigated with normal saline and covered with a bandage. Faculty discuss that a culture may be needed for more severe or persistent cases, and antibiotics may be considered for patients deemed at higher risk for complications.
Subungual Hematoma Trephination
Subungual hematoma trephination is a commonly performed procedure in the primary care setting involving the drainage or removal of blood accumulated beneath the nail surface (Beach, 2020). This often occurs due to trauma or injury to the fingertip, causing bleeding and subsequent pooling of blood under the nail.
Example Simulated Case Presentation for Trephination of a Subungual Hematoma. A patient presents to the clinic after accidentally slamming their finger in a door. The fingertip is swollen, and the nail appears dark reddish purple. The patient reports throbbing pain, and the pressure under the nail is causing significant discomfort. Given the clinical signs and symptoms, the FNP may recommend a trephination to alleviate pain and prevent potential complications.
Procedure Indications. Indications for trephination may include the following: severe pain due to the pressure caused by the accumulated blood under the nail; a large or expanding subungual hematoma which may lead to more pressure and pain; signs of compromised circulation to the affected finger, such as persistent numbness or color changes; cosmetic concerns; and a risk of permanent damage to the nail or surrounding tissues.
Procedure Supplies. The estimated cost per student is $0.98 plus $13.00 for an optional Cautery pen. The supplies used include the following:
- Subungual Hematoma Finger Supplies o Hot dogs
- Cranberry sauce without berries
- Tape
- Tongue blades
- Medicine cups (or similar firm clear plastic) cut into the shape of fingernails
- Procedure Supplies
- 18-gauge needle o Cautery pen (optional)
- Non-sterile 2x2 gauze sponges
- Disposable absorbent incontinent pad
Subungual Hematoma Evacuation Procedure Process. Students practice evacuating the simulated subungual hematoma by first cleaning the site with an appropriate antiseptic. There is no need to anesthetize the digit (Pingel & McDowell). Using a cautery pen, they will then cauterize the nail, stopping when the blood is released. Alternative to cautery, they can create a bore hole with an 18-gauge needle. Caution should be taken to ensure the cautery does not start a fire. Once the hole is made in the nail bed, students express the simulated blood with gentle pressure. They are instructed to clean the site with mild soap and water and apply antibiotic ointment and bandage. Students are told that cautery is contraindicated with acrylic nails. Also, if a patient presents with a nail that is not intact, trephination should not be attempted, and a referral is needed.
Results
Analysis of student’s perceived clinical skill readiness revealed an average presimulation score of 3.286 and post-simulation score of 7.882 (Figure 7). Comparing pre- and post-simulation perceived readiness, every session yielded a significant improvement (p<0.001).
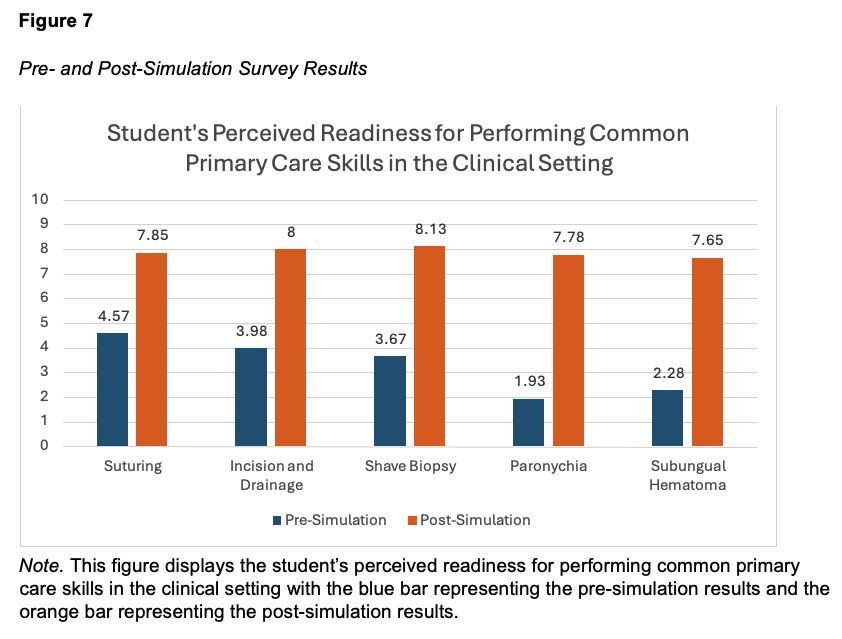
Discussion
FNP students’ confidence in overall perception of readiness to begin clinicals showed significant improvement for each skill taught. Analysis revealed paronychia management (+5.85) and subungual hematoma (+5.37) sessions had the greatest difference in readiness means, yet every session yielded a significant improvement in students’ perceived readiness for clinicals (p<0.001). Qualitative feedback from the simulation included themes of optimized educational engagement, enhanced confidence, and reduced fear of performing these skills in the clinical setting. Development and implementation of simulation-based education for primary care FNP students provides a safe and effective environment for learning and demonstrating skills commonly done in the outpatient setting. Although the costs of simulation can be burdensome to NP programs, the simulations presented here cost less than $100. Innovative use of common items can be an inexpensive solution that still achieves high-impact results. We learned that as much as our students value live models, they also found the simple, low-fidelity methods extremely effective.
Conclusion
Integration of simulation in NP education is a transformative approach to support competency-based education and the mastery of primary care procedural skills for FNP students. Simulation offers FNP students a safe and affordable space for deliberate practice, helping them develop the confidence, competence, and versatility essential for navigating the complexities of primary care practice in accordance with AACN and NONPF competencies. As the healthcare landscape continues to evolve, the value of simulated scenarios in mastering essential skills cannot be overstated. Simulation enhances the educational experience for FNP students and contributes to the delivery of high-quality, person-centered care and competent, practice-ready NPs.
Acknowledgement
The authors would like to give a special thanks to James Clark, BA, MIE, for the creation and editing of the videos and Frank Couch, MPA, for the photos used in this article.
References
Beach, R. (2020). Subungual hematoma evacuation. In G. C. Fowler, B. A. Choby, D. Iyengar, T. X. O’Connell, F. G. O’Connor, B. Reddy, G. V. Segal, & Y. Wah (Eds.), Pfenninger and fowler’s procedures for primary care (4th ed., pp.1311–1313). Elsevier.
Becker, T. (2023). Techniques for skin abscess drainage. UpToDate. Retrieved December 3, 2023, from https://www.uptodate.com/contents/techniques-for-skin-abscessdrainage?csi=96019e8a-db76-4fb3-a16b 531aa747743b&source=contentShare
Derksen, D. J. (2020). Incision and drainage of an abscess. In G. C. Fowler, B. A. Choby, D. Iyengar, T. X. O’Connell, F. G. O’Connor, B. Reddy, G. V. Segal, & Y. Wah (Eds.), Pfenninger and fowler’s procedures for primary care (4th ed., pp.1307–1310). Elsevier.
Appendices